As an Amazon Associate I earn from qualifying purchases.
You can read my full disclosure statement here.
I am so happy to share with you today, my Simple Easy No Work DIY Composting method using a diy compost bin made from a garbage can!
This system is perfect for those who are just beginning with composting. Before using this system, the composting just wasn't happening on our homestead, because I was not turning the pile enough.
Compost Pile vs Bin
This system using a bin, involves no turning of the pile, that is why it is so easy! Just a simple compost trash can that you can make yourself. Once you get the hang of it, you will always have loads of compost at the ready.
Composting in a pile, requires turning regularly, which is just another chore for me. I suppose if you are composting on a very large scale, a pile is likely a better option.
However, a pile needs a cover so that rain does not wash away all the goodness that is in the pile. It is often recommended that a compost pile also have a concrete floor, to make scooping it with a tractor easier.
For small scale gardeners and homesteaders, composting in a bin is just an easier solution in my opinion. And with this method, there is no work!
Equipment Needed for the DIY Composting Bin
A heavy duty plastic garbage can or trash can makes the perfect DIY Compost Bin. Get one with a lid, and you will also need a drill, ¼" drill bit and bungee cord. Or three garbage cans, or however many you think you will need. I currently use three and this works out well. Usually one can I am adding too, one is resting and being turned into compost, and one I am taking compost from and using it in the garden
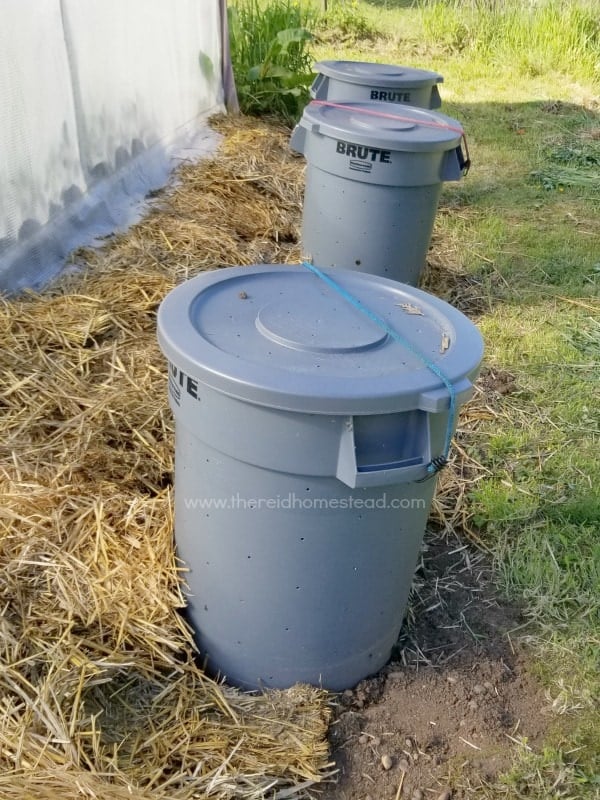
Keep your composting bins in direct contact with the ground to invite the worms in.
The Secret to Easy Gardening, Use Mulch for NO WEEDING!
Food Gardening for Beginners
How to Use Eggshells in the Garden
Our favorite Homesteading and Gardening tools in our Amazon Shop!
Our Garden Harvest Tally Spreadsheet is now available!
Tutorial for a DIY Compost Garbage/Trash Can

Drill the holes evenly spaced 8"-10" apart over the entire can and lid.
OK, on we go with this DIY compost bin! With the drill, poke lots of holes all over the garbage can. Including the bottom and the lid. Approximately 8"-10" apart. Set the can down directly on the earth.
Do not set it on anything but the actual ground, you will see why later. Don't put it up on your deck, or prop it up on some platform. You want the bottom of the bin resting on good ol' dirt.
The "Greens" for Your Compost
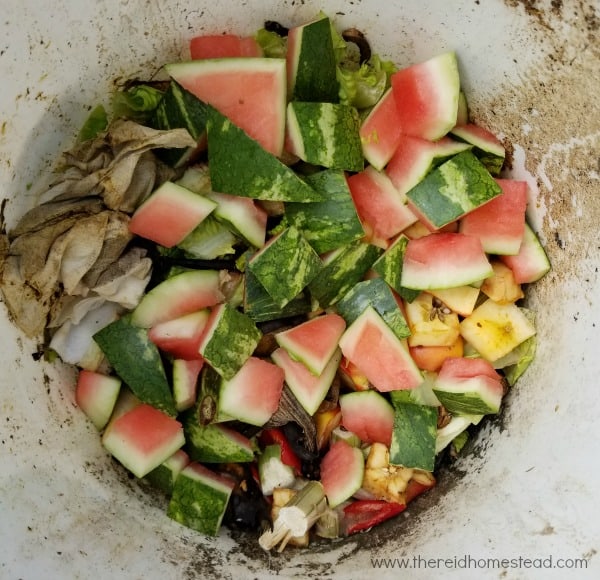
Collect your "greens", including food waste from the kitchen.
Collect kitchen scraps such as vegetable and fruit trimmings, egg shells, coffee grounds and tea bags. For quicker composting, cut things up smaller, or, even blend them. I keep a 5 gallon bucket just outside my kitchen door.
We create a LOT of kitchen waste as I eat mostly plant based. If you don't make much kitchen waste, a cute little compost bin in your kitchen will work. I dump all kitchen waste that is compostable into that bucket after cutting things up smaller like banana peels and watermelon rinds. I aim for things to be 1" square or less in size.
You don't have to cut things up, but it helps break down quicker. These are your "greens" in the composting process. You can use yard waste too if you have it. Don't use things that have been treated with chemicals. For example, if you fertilize your lawn or treat it with weed spray, don't use the grass clippings.
What NOT to Compost
Don't include meat, oils or oily things (like butter or fried veggies or oils in general...or mayonnaise) or dairy products like cheese, milk, yogurt, or eggs. These things will attract vermin and are not good in compost piles. See my article How to Get Rid of Rats on the Homestead.
Do not include your dog or cat waste or any animal waste from animals that eat meat, including human waste.
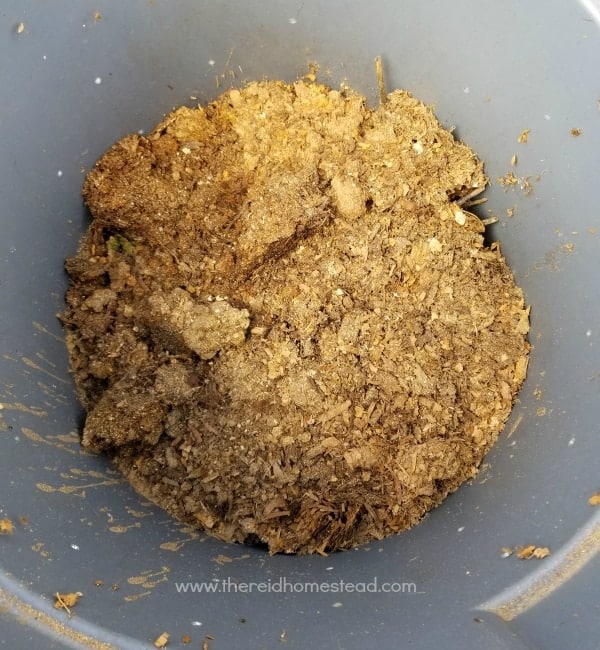
The "Browns" for Your Compost

The "browns" for composting. I like to use spent animal bedding, the manure is fantastic for feeding the soil!
Finding your browns might be the hardest part of this process if you don't have critters on your homestead to utilize. Check out your local feed store to see what they have that might work for you. Feed store prices are going to be the best for large volumes of bedding materials.
My favorite thing to use are equine wood bedding pellets similar to these, but I get them at the feed store. I use them for bedding in my chicken brooders and/or coops. These would work well for your compost if used for any type of animal bedding such as horse, goat, rabbit or poultry (not dogs or cats!).
I also use pine shavings similar to this, that I also get at the feed store. I use the shavings in most of our chicken coops when I run out of the pellets or we also use them in the goat barn. Both the pellets and the wood shavings break down quickly and are easy to store in rubber bins or trash cans until you need them.
The manure mixed in with them is an added bonus. You could also use bags of leaves you raked up last fall (collect these from family, neighbors and friends too! Leaves are GOLD in the garden!), shredded paper or cardboard, saw dust, etc.
Beginner Composting: The Process
When your bucket is full of kitchen scraps, walk on down to where you store your new handy dandy compost bin/trash can. Dump in your kitchen scraps. Add three times that much in brown materials. So if you dump 1 gallon of "greens" in, add 3 gallons of "browns".
Spray with a hose if you want to jumpstart things, getting everything inside good and damp. This will start the magical process of things breaking down in there. Put the lid on. Use bungie cord to keep the lid on by threading through the handles and across the top, to keep pesky raccoons and/or dogs from getting in.
If you are manly, and have the brute strength to do so, you could turn the can on it's side and roll it around to stir things up. I don't. You could stir things inside occasionally if you wanted to with a shovel. I might do this occasionally, but not often. Repeat process until the bin is full. Than leave it, just water occasionally if you notice it is dry inside.
This photo is just after I have dumped in my "greens", than I dumped in 3x that amount in "browns". And then I hose it down a bit, put the lid on, and walk away!
Natures Part of the Composting Process
Now, the magic begins, and everything in there starts to decay. The worms move in from the holes in the bottom. (This is why you set it directly on the ground!) The worms eat the decaying stuff and leave their castings in there which is just more added goodness. If you want to speed up the process, you can buy worms!
In anywhere from 3-6 months time, open the lid, and there you are! You will have lovely compost to layer on your garden in either spring or in fall. That is how I usually time it. You will know it is ready if you dig around a bit and can't identify any of the greens you have put in.
In the spring as I am getting the veggie garden ready for planting, I empty the bins one by one as they are ready, by layering the compost onto my gardening rows. Then I begin filling the bins slowly over the summer.
By fall, when it is time to start cleaning up the veggie gardens for winter, these bins become ready and I put another layer on each row for the winter. When empty, start filling up your compost trash can again, and there you go! Simple, Easy, No Work DIY Composting.
And that is the Simple Easy No Work DIY Composting System
I hope this DIY compost bin tutorial has taught you how easy simple no work DIY composting can be. When I first started learning about composting, I got caught up in all the details and it seemed like a lot of work. As you can see, it doesn't have to be! I try to make gardening in general, as simple as it can be. After all, it is supposed to be FUN!
Other Articles You May Be Interested In:
How to Use Hay and Straw in the Garden
Natural Slug and Snail Control Methods
How to Prevent Tomatoes from Splitting and Cracking
Want to Remember This?
Please pin my "Simple Easy No Work DIY Composting System" tutorial to your favorite gardening board on Pinterest!
jan
Love this, it's what I do too, after having had a compost bin right on the garden bed to save shifting soil when it was 'done' - but took up too much room. This is a much better system, thanks for sharing 🙂
Tamara
Hi Jan! YES! So much easier to move the compost around from these. I usually bring a 5 gallon bucket and shovel to the compost bin, fill it and dump where I need it. 🙂
Jessica
Wow, this looks SO easy! I'm definitely going to utilize it this year. I've been making a "mush" of my kitchen scraps in the blender and digging that into my garden but I'd really like to have some true "black gold" to spread on the garden. I actually already have a spare trash can I can use!
Just a question though, how does this do in a climate that has cold winters? I'm in zone 7 but we do get freezing temps (it was below freezing at night a LOT this winter). Does the moist waste freeze up to where the wormies wouldn't be able to eat it?
Tamara
Hi Jessica! I am in zone 8b and can only speak to that. I think the worms know how to survive in the cold though, they can always go back to the ground and get deep enough to survive, if what is in the can isn't staying warm enough. Good luck!
Amanda
Hello, I would like to know if the cans should be in full sun, partial or shade. I am in zone 9. Thank you for the great tutorial.
Amanda
Tamara
Hi Amanda, I keep them in full sun. Just remember that as the days warm up, especially you being in zone 9, that you may need to open them if it gets up to 70 degrees or warmer. Heat isn't a problem usually in the winter, but as the warm spring days start up, don't forget to open them if it gets warm!
Tamara
OK, I made a boo boo. I had replied to you earlier, and I had thought your question was about winter sowing jugs.....sorry! I now realize it was for the composting bins! Don't open them!!! LOL! Mine get shade in the morning, get mid day sun, and then shade late afternoon. Forget all I said above, as that was meant for growing plants in milk jugs, which you can read more about in my winter sowing tutorial! So sorry about that!
Andrea Frick
What if you don't have enough "browns" to add? What will happen?
Tamara
Hi Andrea, you must use the correct amount of brown, otherwise, it become a stinky soggy mess, not compost. If you don't have browns to add, you could add water and make a compost tea out of the stinky soggy mess, or look up trench composting. Those are two options I would consider. Consider using old cardboard, newspaper, paper grocery bags, saw dust or wood shavings as options for brown. Hope that helps!
Marie
I also put in shredded white paper from my home office. Paper is wood pulp.
Brooke
This makes composting seem doable again! I haven't restarted in the new house
Antoinette Rios
What if I put if I had already added things I shouldn't have? Like Spoiled milk. And left over dinner? It was just one time I did that. Will it be ruined?
Tamara
Hi Antoinette! I don't think one time will ruin the whole pile. It may cause critters to come and investigate it though. Dairy and meat type products put off a much stronger odor that may attract them. Thanks for visiting!
Megan Laginess
I have a rabbit and we use stall pellets (that turn to saw dust when wet) Can I use these. Yes it has rabbit pellets (yay!) in it... but it also has rabbit urine. Is that ok to use as my browns?
Tamara
Yes! That is perfect to use! Those same stall pellets are what I use in my chick brooder boxes and I love how they break down so quickly. Yes, the urine is totally fine.
Linsey
My compost bin has started to get little gnats/fruit flies. Is this normal?
Tamara
That can happen, yes. You may want to add some more brown materials in to help balance things out a bit.
Tony R Deas
Hi. Thanks for your DIY. Enjoying it so far. My question is about the worms. Our ground has a layer of clay that is about eight inches under the topsoil, so I am pretty sure that there are no worms in there.
If we were to buy worms, what kind would you recommend and does it even matter?
Tamara
Hi Tony! Weird you comment just showed up for me all these months later! So sorry! Yes, would recommend that you get worms here (affiliate link): https://unclejimswormfarm.com/?affiliates=530 and you want to get red wigglers. Hope that helps!
Tony R Deas
Hey. That's ok. I had decided to let the cold weather pass before trying to start adding worms to my composting anyway. On that site, the smallest bag of worms is 250. How large of a bed would I need to support 250 worms? Mine is about 3x3 and about 2 feet deep.
Tamara
Hi Tony, are you adding the worms to a composting bin, or to a garden bed? If you are placing them in a compost bin, then I would go with their Red Composting Worm mix. If you are planning to add them straight to your garden bed, I found this article on that sight that might be helpful and it suggest adding European Night Crawlers. I have not ever added worms to my garden beds directly. If you add enough compost and other organic matter such as mulch, the worms will come! Here's the article I mentioned: https://unclejimswormfarm.com/add-european-night-crawlers-garden-lawn/ Hope that helps!
Maria
We accidentally put larger holes in the trash can. We decided to space the holes out. Should this still work with the larger holes? I accidentally grabbed a 3/4 drill bit not a 1/4. I guess I was so excited to get this bin ready, lol
Tamara
Hi Maria! That should work just fine! 🙂
Elma
Tamara,
Your blog is very helpful and encourages me to try new things. I have been wanting to compost for three years, but have been overwhelmed with the information I read. I did try a small composting bin last year, but I was told I had to keep the bin indoors because the worms would die in our Texas summer heat. The indoor composting was going great and the amount of worms multiplied, however, I gave up due to the smell of the compost tea in my laundry room.
The bin I used was made of the similar material that the garbage cans on your post. I really want to try your method: do you believe the worms survive in the plastic trashcans during the hot summer?
Tamara
Hi Elma, I would say it depends on your climate, and where you have the bins located. If you live somewhere where it is really hot, you may want to keep them in a shady area. We have pretty mild summers here in the PNW, so I haven't had any trouble here. Hope that helps!
G.B.
Hi Tamara, really enjoyed reading your compost article. I have been composting for years and now feel like I've been doing it wrong. I have spinning compost bins. I fill them with green & brown matter [ don't wet it bc it gets really wet from the rain]. I try to spin it at least once a day. So I keep adding to one bin until it is full then wait till it becomes compost. Is that what you do? So is it 3-6 months from when you start adding material or once you stop adding?
Tamara
Hi G.B.! I generally add to the can until it is full, and then I start checking it about 3 months later. Depending on conditions such as moisture and temperature, it may be reading then, as soon as 3 months, or it can be ready 6 months or so after I fill the can. Hope that helps!
Dick
Plastic bags, the heavier ones should work too. Just poke holes in the bag and fill it until it is about half full. Flatten the bag a bit so that rainwater is captured and runs down into the holes at the top/sides. A bag is lighter than the barrels, so you can toss it about to mix. It holds the moisture in and if you have holes at the bottom you'll get the earthworms as well.
I sometimes dump the bag and collect some of the worms to add to the other bags as the compost matures.
Claire
This may sound dumb but if you're using 2 trash cans, one for current materials, and the other for ready to use compost, do you drill holes in the 2nd one as you did the first? Thanks!
Tamara
Hi Claire, I usually just leave my ready to use compost in the bin that it was composted in, because I use such large quantities all at once. If you only need smaller amounts, you could store it in a bin without holes if you wanted to.
Melisa
The cardboard and paper do we cut it up and break it down? Sorry don’t know if I missed that. This article is fabulous for my son who’s so into gardening .
Tamara
Hi Melisa, No need to cut it up or break id down, it will naturally decompose over time. However, when laying it down, you do want to overlap all the edges by a few inches, so that no sunlight reaches any part of the ground beneath. Hope that helps!
sandy
Can you continue to add daily greens and browns or do you have to start a new bin? I have a bucket daily-do I just wait until I have enough greens to fill a bin?
Tamara
Hi Sandy, Yes, add greens and browns daily until full. Once the container you are using is full, you will want to leave it until it is ready to use. Once it is full, start a new bin. Hope that helps!
Susan Warren
Tamara, I need your help. First, let me say I love your Homestead blog and all your wonderful informing articles. I don't have a homestead but I have a very full back yard loaded with lots of good food and flowers. However, I am a bit nervous about using my compost. I wish I had known about the trash cans because this is definitely more manageable. I use 4 ft. tall fencing. I make a circle with the fence so that the top has a 3 foot opening. Then I just use zip ties to close the side opening. In the fall, I have plenty of browns, which are my leaves. The summer is another story. I have no browns but everything from kitchen scraps to tons of lawn clippings go into my fence basket. This compose gets wicked hot and smokes when I go to disturb it. Is this going to be usable without the browns? I know people who only use kitchen scraps and they have a beautiful garden. But I am worried that just greens is not going to cut it. I also want to make sure the pile gets hot enough to kill off any weed seeds. What is your thoughts please? Thank you so much for your help...
Tamara
Hi Susan,
Yes, ideally you really need the browns for things to break down well and for it to turn into actual compost. There are so many options for browns, from cardboard and other paper products, to wood shavings you can get at a feed store or saw dust, to straw or even a roll of brown contractor paper from Lowes or Home Depot. Or sign up for GetChipDrop for a load of arborist wood chips for free. The browns add "bulk" to your compost as well as air flow, and provide food to the soil loving organisms that work with the microbes to help to break everything down. The greens, are providing the heat, which is why your pile is so hot. Ideally you want 3-4 parts brown, and 1 part green. If this won't work for you, another option is to trench compost, where you just bury your greens directly in the garden. Hope this helps!
Kate
Miss Tamara, I've tried composting in a little rolling in I bought & it became a home for a gazillion ANTS...have you had this problem with garbage cans? I like your way of composting.
Tamara
Hi Kate, No, I haven't had ants become a problem in my compost bins, but I have had them here in there in the yard and garden. Try using food grade diatomaceous earth around their nests and that should take care of them!
Savannah
Do you ever have issue with ants getting into the compost?
Tamara
Hi Savannah, no I haven't had a problem with ants in my compost before. That might be a regional thing, maybe ask a local gardening group or nursery on how to deal with that. I also never put dairy, oils, or meats in my compost as they can draw unwanted creatures. Hope that helps!
Angela Beasley
Hi! I want to try this but I have a question. When you put one 5 gallon bucket of greens and three 5 gallon buckets of browns does that fill the trash can? Like would I put the next 5 gallon of greens in the same can with three more gallons of browns or go to the next can? Also if it takes a while to fill
Up the 5 gallon bucket is the stuff all nasty? And that’s ok? Like if it took me a month and the stuff is rotten that’s ok?
Tamara
Hi Angela, Yes, the rotten nasty stuff is ok! That's what it does in the compost bin. However, I would not save up a whole 5 gallon bucket before composting it. Ideally, you want it breaking down in the compost bin, with the browns, not in the bucket by itself. Take out whatever you have 1x a week. If you are waiting a whole month, you won't have as good a mix of the greens and browns in the compost bin. So in that case, I would want to mix well the month old rotten bucket with the browns and then letting it sit. By taking it out more often, you will have a better mix of browns/greens in the compost bin without having to mix anything. I hope that makes sense. But yes, as things break down in the compost bin it will settle and not be so full. Hope that helps!
Janet Westrup
I have four 32 gallon plastic cans in my garden with holes to allow air in. They work great except for one problem-rats.
Rats have chewed the holes so wide they can enter and pilfer my compost. Traps don’t work for obvious reasons. We must build a cage out of heavy hardware cloth with hinged doors to put the cans inside so the rats can’t get at the compost and we plan on doing that this Spring.🤨
Tamara
Hi Janet, I'm sorry to hear that you are having a problem with rats in your compost! Are you putting into the compost any meats, oils or dairy? These are known to attract rats and so I always avoid them and have not had this problem. You may want to see my article on How to Get Rid of Rats to help bring down your existing rat population! Hope you can get it under control!
Jen
I have not started composting yet, but I am looking into how to do it. I love your simplistic idea. In pricing trash cans, I noticed that the large plastic storage bins with lids are actually a little cheaper (when comparing same capacity as the garbage cans). I’m thinking either one should work fine considering they would both just be a plastic container with holes drilled in, but I would like someone knowledgeable to actually confirm. Would there be any disadvantages to using the large plastic storage bins instead of trash cans? Thank you!
Tamara
Hi Jen, Yes, I believe large plastic bins would also work just as well.