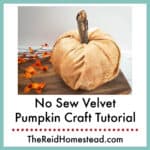
DIY Easy No Sew Velvet Pumpkin Craft
Transform a foam pumpkin into a gorgeous fall decor statement piece with just a few supplies! This easy DIY No Sew Velvet Pumpkin Craft is fun to make and doesn't require a sewing machine!
Yield: 1 pumpkin
Cost: $5
Equipment
- 1 14" x 14" piece of velvet or other fabric
- 1 stick for stem or real pumpkin stem or cinnamon stick
Instructions
- Start by cutting your fabric if needed. If using a different pumpkin form than directed above, be sure your fabric size is correct for your pumpkin prior to cutting as you may need a larger or smaller piece of fabric!
- Take the stem out of the pumpkin. Cut around the stem at the top of the pumpkin, using the scissors. You’ll want just enough room to tuck the corners of the fabric inside, and then to push your stick through.
- Set your pumpkin in the center of the fabric square. Grab one corner and pull it up, then to the top middle of the pumpkin where you carved out the stem. Tuck it into the hole you made.
- Now grab the next corner and do the same thing. Then repeat with the other two corners.
- Stick your finger in there to make sure all of the ends are tucked tightly, then put a very generous dollop of hot glue down in there for the stem.
- Immediately push the stick (or whatever you chose to use for the stem) through the hole, into the glue. Gently hold it there for about 30 seconds until it’s all secure.