Easy DIY Painted Bumble Bee Rocks Craft Tutorial
This step by step guide will teach you how to paint rocks to look like bumble bees!
Yield: 4 rocks
Cost: $5.00
Materials
Supplies You Will Need
- 4 rocks 1.5"x2" oval shaped rocks
- 1 bottle yellow craft paint
- 1 bottle black craft paint
- 1 bottle white craft paint
- 1 paintbrush 1" chip brush
- 1 paintbrush ¼" flat angled artists brush
- 1 paintbrush tiny foam applicator brush (or a Q-tip will do!)
- 1 can Krylon Clear Coating
Instructions
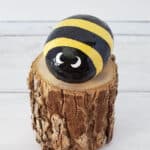
- Paint each rock completely yellow using the 1" chip brush.
- Once dry, add a second coat and a third coat if needed. You can speed up drying time between coats by using a hair dryer.
- Use the ¼” flat angled artist brush to paint the “head” of the bee, and then black lines across the rock. Allow to dry.
- Use the foam applicator brush (or a Q-tip) with white paint to make the eyes, and allow to dry.
- Use the foam applicator brush (or Q-tip) again, to just put a tiny dot of black paint in the middle of the white to finish the eyes.
- Once each rock is completely dry, spray with Krylon Clear Acrylic Coating to seal the paint and protect it from the outdoor elements.